
Printed Paper Lanterns
- iprintedthat
- Oct 18, 2024
- 4 min read
This is your sign to use your craft paper stash
As the nights draw in, our living spaces change. I don’t know about you but mine has definitely become cosier. The sofa and armchairs have moved closer to the fire, I’ve brought out the big fluffy throws and there’s sumptuous cushions to relax back in to. Lighting is also an important part of setting the mood. I don’t want the Big Light turned on, I want the soft glow from lamps to help me feel cocooned, safe and warm.
GO TO >> INSTRUCTIONS
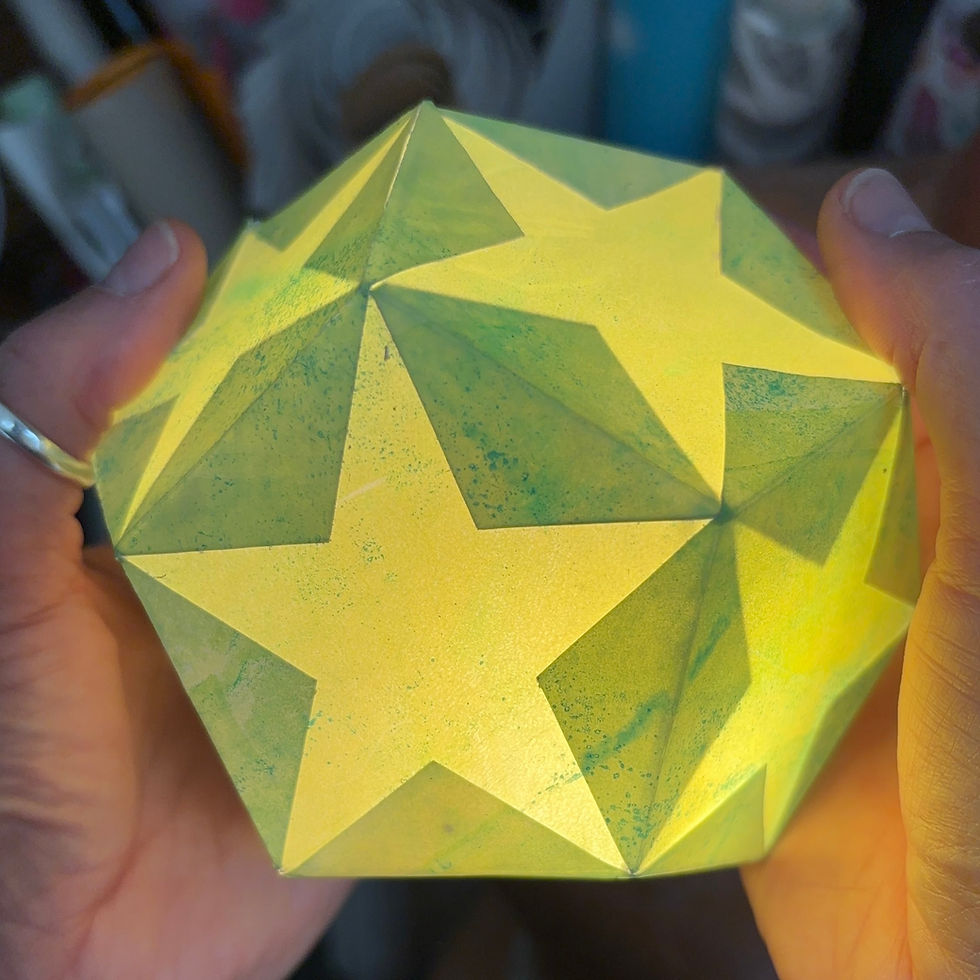
In this month’s Print Club we’re using up our printed papers (AKA that stash of craft paper you’ve had hanging around for ages) to make these professional looking lanterns; when I made the first sample I couldn’t believe how good it looked.
The secret to making the paper translucent is oil - any vegetable oil you’ve got in your cupboards - which allows the soft glow of the light to shine through, creating a warm, inviting atmosphere.
These lanterns are perfect for adding a cosy touch to any room or for setting the mood at events and celebrations. You can place them on tables as centrepieces, use them to light up outdoor spaces during evening events, or even hang them as decorations. I can imagine these in white, dotted around the tables, at a wedding - gorgeous.
GET MORE LIKE THIS SENT TO YOUR INBOX
This activity was October’s featured PRINT CLUB tutorial. Get print and craft tutorials sent to your inbox each month by joining the mailing list HERE.
You’ll automatically become a member of PRINT CLUB which means you also get two complimentary online workshops each year, 30% off selected workshops, exclusive invitations to exhibition previews and studio events, plus a monthly What’s On...newsletter.
VIDEO TUTORIALS
Prefer your tutorials in video format?
or see the
INSTRUCTIONS
YOU WILL NEED:
Please note, overnight drying time is required for this activity
2 x sheets of thick A4 paper (1300gsm - 180gsm). You can paint/print your own paper or use coloured paper. Avoid shiny or metallic paper.
Pentagon-shaped template cut from thick cardboard. Download and print the one below to create the same size lantern that I made.
Pencil
Ruler
Craft knife or scissors
Cutting board (if using a craft knife)
Vegetable or sunflower oil
Paintbrush
Paper glue (glue stick or PVA)
Paper clips (optional)
Battery-powered tea light or push light
HOW TO:
1. Prepare the paper
Using a paintbrush, apply a thin layer of vegetable oil to the back of each sheet of paper. Blot any excess oil with scrap paper, as this will make the paper translucent. Leave the sheets to dry overnight.
2. Cut out your shapes
Using your pentagon-shaped template, trace 11 pentagons onto the oiled paper and cut them out carefully with a craft knife or scissors.
3. Mark the centre points
On the unpainted side of each pentagon, use a pencil to mark the centre point of each edge.

4. Score the edges
On the unpainted side of each pentagon, use the back of the craft knife blade (or a blunt tool) to score lines between the centre points on each edge. This will create five foldable flaps on each pentagon.

5. Fold the flaps
Fold along the scored lines on each pentagon, creating five flaps and forming a star shape. Repeat this for all 11 pentagons and set them aside in a pile.

6. Start assembling the top
Take one pentagon and place it with the unpainted side facing up. This will be the top centre of your lantern. Apply glue to the painted side of one flap. Take another pentagon, apply glue to the unpainted side of one of its flaps, and attach the pentagons together aligning the fold lines. Continue this process, attaching four more pentagons around the top piece to create the first layer.

7. Build the sides
Starting with one of the outer pentagons from the first layer, position it so that the point is facing upwards. Apply glue to the painted side of the left-hand flap. Take another pentagon, apply glue to the unpainted side of one of its flaps, and attach it to the outer pentagon, lining up the fold lines. Repeat this process with four more pentagons to complete a ring around the top.

8. Close the lantern
To begin closing the lantern, fold one of the glued flaps on the top centre pentagon upward, and apply glue to the painted side of the flap. Then, on the neighbouring pentagon, apply glue to the unpainted side of its flap. Attach the pentagons together aligning the fold lines. Continue around the lantern, connecting the remaining pentagons.

9. Finish the structure
To complete the dodecahedron shape, apply glue to two painted side flaps on one pentagon. Then, apply glue to two unpainted side flaps on the neighbouring pentagon. Stick them together, aligning the fold lines. Continue this process around the lantern, leaving one side open for the light.

10. Secure the opening
Apply glue to the remaining unpainted side flaps of the final pentagons and fold them down to create a neat opening on the bottom. Use paper clips to hold everything in place while the glue dries, if needed.

11. Add the light
Once the glue has fully dried, turn on your battery-powered light, and place the lantern over it, letting the light shine through the translucent paper.
ENJOYED THIS?
Then you might like to join my mailing list HERE. You’ll automatically become a member of PRINT CLUB which means you get tutorials like this sent to your inbox each month, two complimentary online workshops each year, 30% off selected workshops, exclusive invitations to exhibition previews and studio events, plus a monthly What’s On...newsletter.
I'd love to know if you tried out this tutorial. Add a comment and come find me on Instagram or Facebook


Comments