
Relief Printing With Craft Foam
- iprintedthat
- Feb 22
- 3 min read
A lo-fi take on jigsaw linocut

I’ve taught a few jigsaw linocut workshops recently and it got me thinking…how could I turn this into a lo-fi printmaking activity that you could try at home, without specialist tools or lino?
After a bit of experimenting, I came up with the tutorial below. It uses craft foam instead of lino and relies on impressions rather than carving to create detail. It’s proof that printmaking doesn’t have to be complicated.
But first…
WHAT IS JIGSAW LINOCUT?
Jigsaw linocut is a relief printing technique that allows you to quickly add colour to a print without needing to carve a separate lino tile for each colour. Once the design is carved, the tile is cut into shapes. Each shape is then inked up, put back together, and printed - hence the name: jigsaw.
My version swaps lino for sheets of craft foam. Instead of carving, you make impressions with a pencil to create detail. There are a few things you can’t do with foam that you can with lino, but I think it works pretty well. Have a go yourself and let me know what you think.
GET MONTHLY TUTORIALS LIKE THIS SENT TO YOUR INBOX
This activity was February’s featured PRINT CLUB tutorial. Get print and craft tutorials sent to your inbox each month by joining the mailing list HERE.
HOW TO MAKE A JIGSAW PRINT WITH CRAFT FOAM
YOU WILL NEED:
A simple design
Tracing paper
Pencil
Craft foam sheets
Permanent marker pen
Craft knife and cutting board
Ink pad stamps (in your choice of colour)
Paper to print onto
Rubber roller (brayer) or a rolling pin
HOW TO:
1. Trace your design
Start by tracing your simple design onto tracing paper using a pencil.

2. Transfer the design
Flip the tracing paper over so the pencil marks are facing down and place it onto the craft foam.
Using your pencil, go over the traced lines to transfer the design into the foam.
Don’t press too hard or you’ll go through the paper, but don’t be too light either or it won’t show. You can check it’s working by carefully lifting a corner of the tracing paper while keeping it in place.
NB: The transferred image will be a mirror image of your original design, which is exactly what you want for printing. This is especially important to remember if your design includes text.

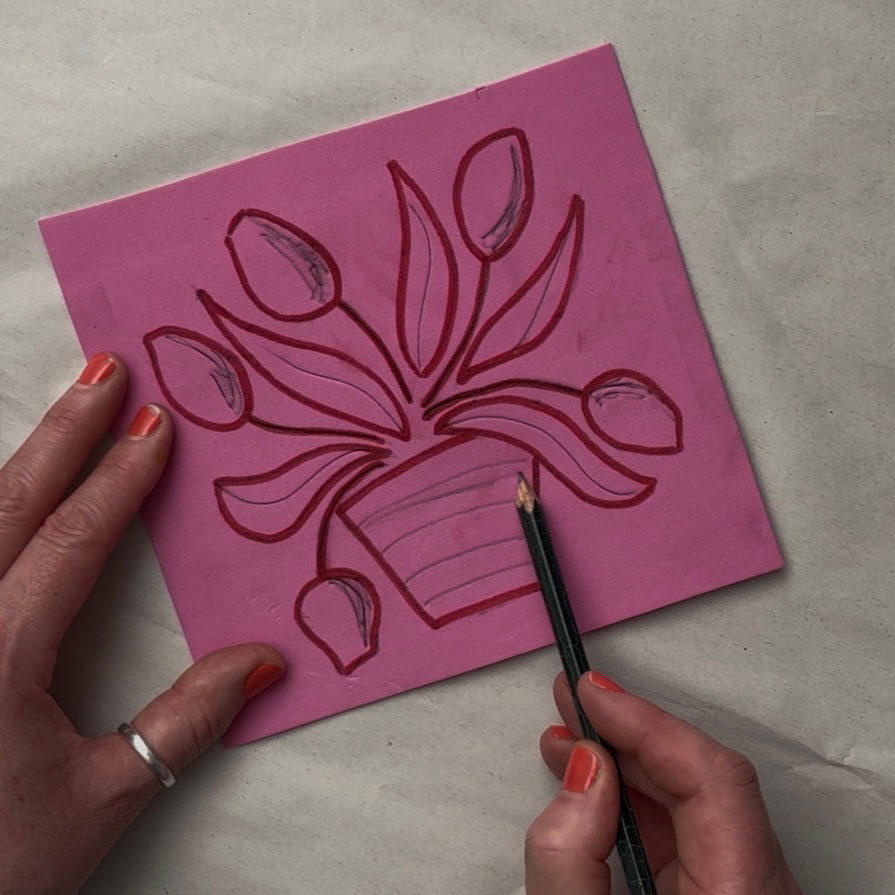
3. Define the shapes
Once the design has transferred, go over the pencil marks on the craft foam with a permanent marker pen. This will make the shapes easier to see when cutting.

4. Add detail
Use your pencil to add detail to both the individual shapes and the main foam base.
Try not to drag the pencil across the surface, as this will stretch the foam. Instead, use a gentle stabbing or pressing motion to create lines and texture.
5. Cut out the jigsaw pieces
Using a craft knife, cut out the solid shapes from the foam.
If it’s not immediately obvious where each piece belongs, it can help to number the backs so you know how they fit back together later.

INKING UP AND PRINTING
6. Ink the background
Ink up the main foam background by pressing the ink pad firmly all over the surface. You might need to tap or “bang” it quite hard to release enough pigment.
Carefully pick it up by the sides and lay it ink-side down onto your paper.

7. Ink the jigsaw pieces
Ink up each cut-out piece in the same way, then fit them back into the cut-out spaces on the paper — just like a jigsaw.

8. Apply pressure
Once your jigsaw is complete, firmly roll your roller across the surface. Be careful not to stretch the foam as you do this.
If you don’t have a roller, you can use a rolling pin, or simply apply pressure with your fingers and palms over the back of the paper, making sure you press evenly across the whole image.

9. The reveal
Finally, peel the foam sheet from the paper to reveal your print.

You can reuse your foam jigsaw over and over again. Wash and dry the pieces if you’d like to experiment with different colour combinations.
ENJOYED THIS?
Then you might like to join my mailing list HERE.
You’ll automatically become a member of PRINT CLUB which means you get tutorials like this sent to your inbox each month, two complimentary online workshops each year, 30% off selected workshops, exclusive invitations to exhibition previews and studio events, plus a monthly What’s On...newsletter.
I'd love to know if you tried out this tutorial. Add a comment and come find me on Instagram or Facebook


Sewa mesin fotocopy can be a practical option for businesses that deal with a lot of paperwork. Some machines come with extra features. It really depends on what is needed.